Pages

header2

Image Map

adsense

Thursday, May 4, 2017

Mario Cross-stitch free pattern

I've demoted my sewing blog back to Blogger so my apologies for the lack of bells and whistles I used to have with Wordpress!!! I just couldn't justify the cost of hosting when I'm happy to be a hobby blogger!

I am reposting this tutorial after a friend in a homeschool group asked for something similar!  This was a fun project to teach myself cross stitch!
Months later my son still enjoys keeping his accessories in this bag!  

To start, I used a figurine to copy the design on cross-stitch fabric.  If you don't have something to copy, I created this free pattern to print and follow!  Just click here!


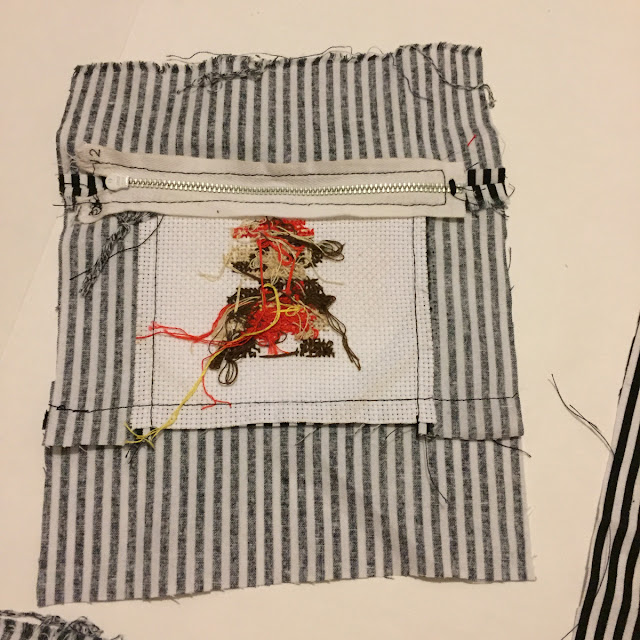
Once I had the design done on the canvas, I cut out scraps of fabric to make the bag.  You'll need a long strip for the strap, one rectangle for the back, and 4 pieces to sew around the cross stitch design.   I added a zipper between the design and the top of the front.  Here's a view of the front piece of the bag so you can see how I pieced everything together.  And yes, I am a complete newb at cross stitch.  Don't be like me.....look up the proper way to tie off stitches on the back! LOL!  At least when it's put together you don't notice the mess!


Here's the front, back, and the long piece that will be the strap.
 
Sandwich the finished strap between the front and back and sew all around, leaving a 3" hole to turn right side out! 
  

Once it is finished you have a fun little game bag for your kids to keep their accessories!  Show me what your kids are making!  I'm on instagram at @sewingmamaraeanna!
My son isn't at the level to do a Mario but he's getting there!

Christian is enjoying his first cross stitch activity! Kind of a free for all, but he did make a few "x" marks!

A post shared by RaeAnna Goss (@sewingmamaraeanna) on

Thursday, March 30, 2017

Bunny Drawstring Bags - Free pattern!

I have a super easy and sweet tutorial for you today!  I wanted to create a bunny pouch that I could sew up quick with all enclosed seams and no buttonholes!  It is sew easy and youll be able to whip up a bunch in a short amount of time!

What youll need:
  • 4 squares of fabric 5x5 (2 outer and 2 lining)
  • 2 sqaures of fabric for your bunny ears (5x5) you can use contrasting fabric for these!
  • seam ripper
  • ribbon for drawstring

Step one:

With your contrasting fabric, use a fabric marking pen and draw two ears.  Place fabric right sides together and sew along the line.  Trim around each ear.
Bunny Pouch DIY Sewing Mama RaeAnna

Step two:

Turn ears right side out and press seam.
Bunny Pouch DIY Sewing Mama RaeAnna

Step three:

Take your two outer fabric squares and sew along three edges.  Clip corners
Take your two lining fabric squares and sew along three edges but leave a 2 opening to turn the pouch in a later step.
Bunny Pouch DIY Sewing Mama RaeAnna

Step four:

VERY IMPORTANT!!!  Do not skip this step!
Press the seam open on the outer fabric squares near the top raw edge.  This will allow you to thread your ribbon casing and keep you from having to sew button hole openings for the ribbon!  Repeat for the other side seam.
Bunny Pouch DIY Sewing Mama RaeAnna

Step five:

Turn the lining square pouch right side out.  Place inside outer fabric so the right sides of both are facing each other.
Bunny Pouch DIY Sewing Mama RaeAnna

Step six:

Now, fit your bunny ears in between the layers of the pouches.  You will want to slide them in so all the raw edges line up at the top.
Bunny Pouch DIY Sewing Mama RaeAnna

Step seven:

Pin in place all along the top edge.  Sew along the edge with a 1/2 seam allowance.
Bunny Pouch DIY Sewing Mama RaeAnna

Step eight:

After sewing around entire circle, bring the lining out to find the 2 opening.
Bunny Pouch DIY Sewing Mama RaeAnna
Flip pouch right sides out through the 2 opening of the lining.  Sew the lining opening closed.
Bunny Pouch DIY Sewing Mama RaeAnna

Step nine:

Stuff the lining down into the pouch. I forgot to take a tutorial picture for this step, but you will want to sew a casing 1/2 below the top of the pouch.  (You can see the casing stitches in the picture below.  Then, take your seam ripper and remove the 3-4 stitches between the bottom casing stitch and the top of the pouch.
Bunny Pouch DIY Sewing Mama RaeAnna

Step ten:

Take one ribbon (approximately 16) and with a safety pin, insert the ribbon all the way around the casing.  One ribbon will enter on the right side seam and exit on the right side seam.
Bunny Pouch DIY Sewing Mama RaeAnna

Step eleven:

Repeat step ten, only inserting the second ribbon on the left side seam and running it through the entire casing back to the left side.
Bunny Pouch DIY Sewing Mama RaeAnna

Step twelve:

Knot the ends of the ribbon (trim off any excess length that you dont want) and pull tight to create the drawstring!
Bunny Pouch DIY Sewing Mama RaeAnna
Im looking forward to filling them up with treats for the kids on Easter!  Pin the pictures below to save the directions for your next sewing project!
Bunny Pouch DIY Sewing Mama RaeAnna
And this project that I made for Andreas Notebook!
bunnies

Thursday, July 3, 2014

Cousin Pictures of 2014 - Handmade from the Heart!


It is such a blessing to see family additions each year in our yearly cousin pictures!  When Christian was 11 months old we went out to visit our family in Idaho and I made matching outfits for the 3 boys!

Left to Right: Sam, Robert, Christian

I used the Children's Corner Johnny pattern for Sam and Christian and made the shorts for Robert from a vintage pattern!  (The polo shirt is store bought)

In 2012 we went back to Idaho and I had recently been playing with my new embroidery machine so I needed to use that for the outfits!!!
I used a free PDF pattern for the shorts and Eva Mae's dress is the Lucy by Children's Corner!

In 2013 we had our Idaho cousins come to us!!!  The theme this year was seersucker!  I blogged about it HERE!

And no in 2014 we have another addition in our Idaho cousin lineup!
Left to Right: Eva Mae, Izzy, Eva

Little Izzy is such a sweet baby!  She is the first baby born to the youngest of Nick's brothers!  Eva Mae had such a fun time with her sweet girl cousins!

The outfits I made this year were only for girls since we have another little cousin in our family on my side!  I made 2 Bumblebee dresses, a free pillowcase romper pattern, and the outfit that Eva Mae is wearing is blogged about HERE!


I love my sweet nieces and nephews!
Baby Grace in the Bumblebee 

Eva in the Bumblebee 

Izzy in the pillowcase romper

 Eva Mae in the O+S shorts and E&E top

I have a lot of work to do to catch up on some blog posts after such a long vacation!  I hope you all have had a great summer so far!

If you are in a craft store this month go check out my first print publication in the Creative Machine Embroidery Magazine!!!!  I was so excited to see it in my mail when I got home yesterday!  I would love to hear from you if you use my tutorial to make a gym bag or towel for yourself!


Monday, June 30, 2014

Romper Week Winners

Hooray!  The winners have been chosen in our Romper Week Prizes!  Thank you to everyone that cast a vote for the link up participants!


Citrus Retro Romper from E&E Patterns Pleated Playsuit | The Inspired Wren
 

And the random winners of the Rafflecopter Giveaway are:

1 winner will receive a yard of Ann Kelle fabric
1 winner will receive a PDF pattern by Mouse House Creations
1 winner will receive a PDF pattern by Sewing Mama RaeAnna


If you missed any of the link up looks, check them out here!  Thank you again for playing and participating in our romper week!!!
LINK PARTY

Sunday, June 22, 2014

#whyisew


Have you heard of Throwback Thursdays or Flashback Fridays?  It's where people upload old photos and we all get to laugh, cry, sigh, smile..... pretty much feel all sorts of nostalgia and emotion when looking at those old memories!

This week we invite you to join us on a similar adventure regarding sewing!  I know there are many readers out there who are well seasoned and have been sewing for years, and there are also a lot of new beginners - many of them new moms - that are just now finding the skill and enjoyment of sewing!

This series will be so much fun as we learn more about each other, why we sew, and what inspired us to learn!  At the end of this post we would love for you to write your story and link it up to the link party so we can learn more about you!!!  And all this week, make sure you check out the stories on these blogs!!!
 

RAEANNA'S STORY
Since I have the floor right now I am going to give you the long version!  For me, sewing became part of my life as a little girl.
My grandma, Eva Mae Smith, LOVED to sew and made many outfits for me and my brothers as well as all my doll clothes!  When I was around 10-12 she spent time teaching me how to sew on my mom's sewing machine in our basement.  That sewing machine didn't get a lot of use.  Although my mom had good intentions of using it, we only got it out a few times to do projects like a quilt and Bible cover for one of our homeschool co-op classes.

One year in college I had grand hopes of relearning and "stole" my mom's rarely used sewing machine.  It ended up making the move with me when I got married after graduating.  But unfortunately it sat in my closet until our bed broke....

Yep, our bed broke (not due to any adult content!!!!) Trying to play "fix it," I found that if I propped that heavy duty sewing machine hard case under the wooden bed frame where the screws had been stripped we could manage without having to buy any new furniture!

So, for about 5 years (!) my sewing machine served the purpose of playing bed frame!

Now we reach the chapter of the birth of my sweet baby boy, Christian in 2009!  I was DETERMINED to learn how to sew and use this heavy duty 1980s sewing machine so I looked up videos on YouTube and took the beginning sewing class at JoAnns!

It mustered my courage to try my first pattern! (And you have the good fortune to check out the pictures!!!  I documented the process in a Facebook photo album!)

This was my first time laying out a pattern and figuring out how to construct it all!

I made a TON of mistakes!


I think the worst of all the mistakes is this fabric!!!  What was I thinking!??!?!


I also made a huge mistake by cutting my snap tape the wrong size so I had to cut the legs off and make it a shorts romper.

I started scouring the internet during my lunch hour at school (I taught elementary music k-5 from 2002-2011) and I found chat rooms and message boards that led me to Children's Corner Patterns!  I was so lucky that I lived less than an hour away from their store!


The Johnny was my first Children's Corner pattern and I fell in love with their designs!


I was so proud of my first real success and went on to basically learn how to sew through the Children's Corner patterns! (I made a TON of jon-jons for Christian and as gifts, as well as several Lucys and Frannie Baby.  I also learned how to picture smock with the Johnny pattern!)

Now, enter the chapter of the birth of Eva Mae in 2011 and my blog start-up!


Having 2 years of sewing experience before Eva Mae was born, I was ready to try to share my knowledge so I started my blog!  You may have noticed that my grandma's name is carried on with my daughter!  I wrote a lengthy post about her in a Project Run & Play challenge HERE.

It was also after the birth of Eva Mae that I discovered PDF patterns!  This peasant dress (Emma by The Sweetest Patterns) was the very first PDF pattern I bought!  I found some great blogs (Sew Mama Sew, MADE, Made by Rae, Me Sew Crazy, and Craftiness is Not Optional were the first blogs that I followed!)

Emma Dress and modified hat from Simplicity 7994

Having a heart for teaching and no longer fulfilling that passion in the classroom, I turned to sewing and felt fulfilled whenever I shared my knowledge with other local moms, or created a tutorial for my blog! I taught 5 classes - some in my home and some at the public library - to help moms learn the basics of using their machine and that sewing wasn't anything to be afraid of!!!  I've always said if I could teach myself, you can too!!!

We all start somewhere and I am a testimony that if you stick with something you will see a return investment!  I would have never thought that Jessica of Me Sew Crazy would pick me to be on her Sewing Rabbit team!  Or that fabric companies would seek me out!  Or that I would find a passion in designing PDF patterns!  Meeting bloggers through sew along contests and in real life has inspired me and given a sense of purpose to my hobby and I am so excited to see what is to come in the next chapter!

So, why do you sew?  When did you learn?  Write your story and share it here!  Or, maybe this post has inspired you to try for the first time?!  If so, let me recommend a Sewing 101 series for you HERE!

Saturday, June 21, 2014

30 Days of Sundresses - Rows of Ribbons

Don't you love it when you get an idea and realize that you have just the right amount of PERFECT materials and notions to make it happen?!  That was me today!!!


I wanted to do something with my ribbon stash for the 30 Days of Sundresses Series since I always seem to think "Oh wow!  That's a great deal on ribbon!  I better buy it!" every.single.time I walk into the fabric store!  When I got out all my little spools of 1/2" grosgrain I realized I also had the perfect fabric to pair with it!


 This fabric is "La-Dee-Da" by Westminster and was in the remnant section of Textiles - an awesome fabric store in Nashville!  In fact, when this post goes live they will be in the middle of their HUGE summer sale!  If you're in town you need to check it out! 50% everything and 75% remnants!  (don't worry.... if you don't tell my husband where I'm shopping I won't tell yours!)


I love how the fabric print has little lines that are reminiscent of ribbon or tape! I did a little "Happy! Happy! Joy! Joy!" Dance when I realized how perfect it would match!

Ok, so enough of the cute Eva Mae pictures, here's the easy-peasy tutorial on how you can create the same look!

Materials for a 18-24m:

(I've done the math for this size but you could customize any type of bodice and skirt pattern to make it work for you!  Just make sure you know how long you want your ribbons for the bodice and ties before you cut the ribbon!)  
  • Bodice Pattern and fabric for the main and lining (print the pattern in 18-24m here)
  • Fabric for the skirt - 44" wide by 15" long
  • 15 strands of 1/2" grosgrain ribbon that are 14.5" long
  • Sewing machine and notions (pins, thread, optional fabric glue)

Step 1

Print out your pattern and cut out fabric for the front and back bodice in the main fabric and lining fabric.  Transfer the markings of the pattern onto the fabric for ribbon placement.

Step 2

Place the bodice ribbon on the main front fabric and sew on to the bodice.


Step 3

Prepare the shoulder strap ribbons


Place them according to the placement markings and baste in place 1/8" from the top raw edge.


Step 4

Place front lining right sides together with front main.  Pin in place and stitch the top and curve as shown in the picture below.  Clip the corners and the curve and turn right side out.  *DO NOT SEW THE SIDES OR BOTTOM! (We will need to attach the back bodice in a later step.)*


Step 5

Repeat steps 1-4 with the back bodice.  Again, make sure you leave the sides and the bottom open.  Turn right side out and press all seams.

Step 6


Now we will attach the front bodice to the back bodice at the sides.  Place bodice pieces right sides together.
 Open up the right side of the front and back bodice so your lining and main fabric are right sides together as shown.

Pin and sew 1/2" seam allowance down the sides.  Trim seam to 1/4".

Step 7

Turn the bodice right sides out and turn the lining in by folding down the side. Topstitch all around the top opening of the bodice.  This will give it a professional look and help secure the ribbon inside.

 Step 8

Now let's work on the skirt!  A helpful hint!  If you can cut your skirt from one piece of fabric - (My measurements for the 2T are 44"x19" so it made it easy to cut across the width of the fabric) - I find that ironing a crease in the middle will help line up the skirt to the bottom so all the gathers are even.

Place skirt piece(s) right sides together.  Sew and finish the edges with a serger, zig zag stitch or pinking shears to prevent frayed edges.  (Or, sew the skirt with a french seam.)

Step 9


Sew two gathering rows across the top of the skirt - 1 at 1/4" and one at 1/2".  Gather the skirt to match the opening of the bottom of the bodice.


Step 10

Pin the skirt to the bottom of the bodice with right sides together.  Match the seam of the skirt to the side seam of the bodice.  If you ironed a crease you can match up that crease with the other bodice side seam.
 

 Sew with a 3/4" seam allowance and then finish the seam with a serger or zig zag stitch.  Turn bodice up and press the skirt seam up to the bodice.  I chose not to topstitch the skirt to the bodice because of the placement of the ribbon on the bodice.

Step 11

Turn the skirt bottom edge 3/4" and press.  Turn under again 3/4" and hem the bottom edge of the skirt.


You're finished!  Tie the ribbons at the shoulders!

I added my Spoonflower label to the outside back for a little extra detail! 


Thanks for reading through!  If you make a dress using the tutorial I would love to hear about it!!!  Tag me on Facebook or Instagram or e-mail me a picture!  Also, you can use the hashtag #30daysofsundresses to see what others are making this month!


Make sure you check out all the other awesome sundress posts and have a wonderful summer!


Sewing Mama RaeAnna Blog

LinkWithin

Related Posts Plugin for WordPress, Blogger...